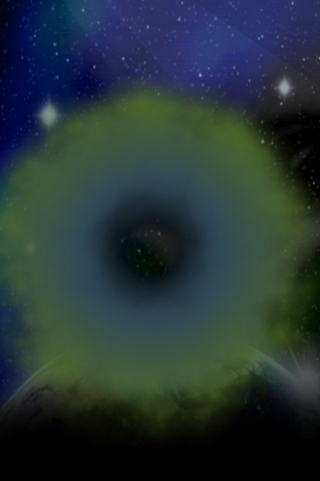
Particles can be used in a wide variety of situations and it's possible to create all kinds of interesting effects. In this example we look at how the commands can be used to create an effect that makes it look as if the particles form some kind of gas cloud.
This example program relies on an external image named "particle.png":

Only a few lines of code are required for this program, beginning with a call to set the virtual resolution and loading an image that will be used by the particles:
SetVirtualResolution ( 320, 480 )
LoadImage ( 1, "particle.png" )
A particle emitter is created and positioned at coordinates 150, 250, followed by properties being set such as the frequency, life and forces. All of these combine together to create the effect demonstrated by this program.
Here's the code used:
CreateParticles ( 1, 150, 250 )
SetParticlesFrequency ( 1, 500 )
SetParticlesLife ( 1, 3 )
SetParticlesSize ( 1, 64 )
SetParticlesStartZone ( 1, -2, 0, 2, 0 )
SetParticlesImage ( 1, 1 )
SetParticlesDirection ( 1, 25, 50 )
SetParticlesAngle ( 1, 360 )
AddParticlesForce ( 1, 2.5, 3.0, 0, 200 )
AddParticlesColorKeyFrame ( 1, 0.0, 0, 0, 0, 0 )
AddParticlesColorKeyFrame ( 1, 0.5, 0, 0, 0, 0 )
AddParticlesColorKeyFrame ( 1, 1.5, Random ( 0, 255 ), Random ( 0, 255 ), Random ( 0, 255 ), 255 )
AddParticlesColorKeyFrame ( 1, 3.0, Random ( 0, 255 ), Random ( 0, 255 ), Random ( 0, 255 ), 0 )
Try experimenting with the properties in order to see the impact that they make on the program. Here's a few suggestions:
When the particles were created no maximum amount was set, therefore particles will continue to emit until such time that the emitter is destroyed, so it's not necessary to do anything other than update the contents of the screen within the main loop:
do
    sync ( )
loop
Everything is now in place. Here's the final code for our program:
SetVirtualResolution ( 320, 480 )


CreateSprite ( LoadImage ( "alien_backdrop.jpg" ) )
LoadImage ( 1, "particle.png" )


CreateParticles ( 1, 150, 250 )
SetParticlesFrequency ( 1, 500 )
SetParticlesLife ( 1, 3 )
SetParticlesSize ( 1, 64 )
SetParticlesStartZone ( 1, -2, 0, 2, 0 )
SetParticlesImage ( 1, 1 )
SetParticlesDirection ( 1, 25, 50 )
SetParticlesAngle ( 1, 360 )
AddParticlesForce ( 1, 2.5, 3.0, 0, 200 )
AddParticlesColorKeyFrame ( 1, 0.0, 0, 0, 0, 0 )
AddParticlesColorKeyFrame ( 1, 0.5, 0, 0, 0, 0 )
AddParticlesColorKeyFrame ( 1, 1.5, Random ( 0, 255 ), Random ( 0, 255 ), Random ( 0, 255 ), 255 )
AddParticlesColorKeyFrame ( 1, 3.0, Random ( 0, 255 ), Random ( 0, 255 ), Random ( 0, 255 ), 0 )


do
    sync ( )
loop
The effect that has been created in this example is another good demonstration of what is achievable when using the particle commands.
![]()
App Game Kit © The Game Creators Ltd. All Rights Reserved. Report an issue