Text entities have a number of properties that can be set such as their alignment, size and spacing. This example demonstrates how to set these properties and see their effects.
The process involved is as follows:
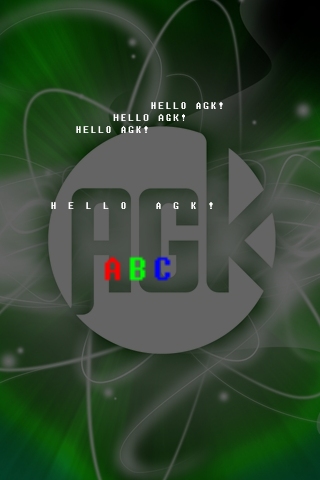
Five text entities will be created with the first four having their contents set to "HELLO AGK!" and the remaining string showing "ABC":
CreateText ( 1, "HELLO AGK!" )
CreateText ( 2, "HELLO AGK!" )
CreateText ( 3, "HELLO AGK!" )
CreateText ( 4, "HELLO AGK!" )
CreateText ( 5, "ABC" )
To position text call the SetTextPosition command. This command has three parameters: ID number of the text, X position and Y position. For example, this line of code sets text 1 to be displayed at 100, 100:
SetTextPosition ( 1, 100, 100 )
By setting the size of a text entity it's possible to have larger or smaller text displayed on screen. The command SetTextSize is responsible for controlling the size of text. It takes two parameters: ID number of the text and a size value (the default is 4). As the size value gets bigger so the text on screen increases in size. In this example text 1 is set to a size of 10, while the size of text 2 is set to 20 (making it twice as large as text 1):
SetTextSize ( 1, 10 )
SetTextSize ( 2, 20 )
Text can be aligned to the left, center or right. To control the alignment of text call the command SetTextAlignment. This command takes two parameters: ID number of the text and a value controlling the alignment. By default the alignment is set to 0 meaning left justified. A value of 1 centers the text, while a value of 2 will justify text to the right. The lines that follow set text 1 to left alignment, text 2 to center alignment and text 3 to right alignment:
SetTextAlignment ( 1, 0 )
SetTextAlignment ( 2, 1 )
SetTextAlignment ( 3, 2 )
This property controls the space between individual letters, it's controlled with the command SetTextSpacing. Two parameters are required for this command: an ID number and a value controlling the spacing. By default the spacing is 0 meaning no gaps between letters. Increasing this value will result in larger gaps between letters. Decreasing this value will have the effect of letters overlapping each other. This line of code sets the spacing of text 1 to 20, resulting in there being a gap of 20 pixels per letter:
SetTextSpacing ( 1, 20 )
Text can either have individual letters colored or be colored as a group. To color a specific character within a text entity call the command SetTextCharColor passing in an ID number, followed by an index representing the location of the character (starts at 0), then four values controlling the red, green, blue and alpha color channels. This example shows the first letter of text 1 being set to red:
SetTextCharColor ( 1, 0, 255, 0, 0, 255 )
To change the color of the whole text entity call the command SetTextColor passing in an ID number, followed by the red, green, blue and alpha color channels. This line sets the whole of text 1 to be displayed as red:
SetTextColor ( 1, 255, 0, 0, 255 )
Now that we've seen how to control certain properties of text we can proceed to setting our text on screen. The position of text 1 is set to 150, 100 and its size set to 12:
SetTextPosition ( 1, 150, 100 )
SetTextSize ( 1, 12 )
This text is positioned directly below text 1, has its alignment set to the center and its size set to 12:
SetTextPosition ( 2, 150, 100 + GetTextTotalHeight ( 1 ) )
SetTextAlignment ( 2, 1 )
SetTextSize ( 1, 12 )
Note that the command GetTextTotalHeight is being used to control the Y position of this text entity. In this instance we're finding out the height of text 1. Therefore positioning our 2nd text entity at this height will result in it being placed directly underneath text 1.
This text is placed underneath text 2, has its alignment set to the right and its size set to 12:
SetTextPosition ( 3, 150, 100 + GetTextTotalHeight ( 1 ) + GetTextTotalHeight ( 2 ) )
SetTextAlignment ( 3, 2 )
SetTextSize ( 3, 12 )
As this text entity is being placed directly under the previous two text entities it's simply a case of adding their heights together to calculate the Y position for this entity.
This text is positioned at 50, 200, has its size set to 12 and then its spacing set to a value of 10:
SetTextPosition ( 4, 50, 200 )
SetTextSize ( 4, 12 )
SetTextSpacing ( 4, 10 )
The final text entity has its position set, followed by a large size and finally each character is colored individually with the A being set to red, the B being set to green and the C being set to blue:
SetTextPosition ( 5, 50, 250 )
SetTextSize ( 5, 40 )
SetTextCharColor ( 5, 0, 255, 0, 0, 255 )
SetTextCharColor ( 5, 1, 0, 255, 0, 255 )
SetTextCharColor ( 5, 2, 0, 0, 255, 255 )
Everything is now in place. Here's the final code for our program:
SetVirtualResolution ( 320, 480 )


backdrop = CreateSprite ( LoadImage ( "background7.jpg" ) )
SetSpriteColorAlpha ( backdrop, 100 )


CreateText ( 1, "HELLO AGK!" )
CreateText ( 2, "HELLO AGK!" )
CreateText ( 3, "HELLO AGK!" )
CreateText ( 4, "HELLO AGK!" )
CreateText ( 5, "ABC" )


SetTextPosition ( 1, 150, 100 )
SetTextSize ( 1, 12 )


SetTextPosition ( 2, 150, 100 + GetTextTotalHeight ( 1 ) )
SetTextAlignment ( 2, 1 )
SetTextSize ( 2, 12 );


SetTextPosition ( 3, 150, 100 + GetTextTotalHeight ( 1 ) + GetTextTotalHeight ( 2 ) )
SetTextAlignment ( 3, 2 )
SetTextSize ( 3, 12 )


SetTextPosition ( 4, 50, 200 )
SetTextSize ( 4, 12 )
SetTextSpacing ( 4, 10.0 )


SetTextPosition ( 5, 100, 250 )
SetTextSize ( 5, 40 )
SetTextCharColor ( 5, 0, 255, 0, 0, 255 )
SetTextCharColor ( 5, 1, 0, 255, 0, 255 )
SetTextCharColor ( 5, 2, 0, 0, 255, 255 )


do
    Sync ( )
loop
By setting text properties it's possible to really customize the output so it's a perfect fit for your game.
![]()
App Game Kit © The Game Creators Ltd. All Rights Reserved. Report an issue