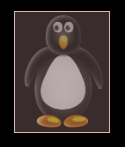
When using physics related commands within AGK, one of the key decisions is to consider how your sprite will be represented. For example, take this penguin sprite:

From the perspective of collision handling it will be seen in a different manner, as AGK will take this sprite and create a bounding box, circle or convex hull around it. Which shape is used is dependent on the command SetSpriteShape. A value of 0 defines no shape, a value of 1 defines a circle, a value of 2 means a box and finally a value of 3 means polygons (as a convex hull).
The command SetPhysicsDebugOn allows us to see the impact of using SetSpriteShape, as it will draw the collision shape on screen. When this command is used we can see the differences between shapes.
Here's how the sprite looks when a box is being used:
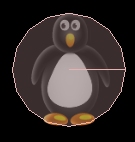
This time when a circle is used:
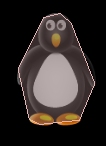
Finally when polygons are selected:
A typical game will end up relying on a mixture of shapes being used to represent sprites, with possibly the majority using circles and boxes (as this is very efficient) and a smaller amount using polygons (as this is more of a drain on the system). The overall goal is to find a balance that is suitable for your game. The use of circles and boxes will provide better performance, while the usage of polygon shapes will give you more accuracy. The aim is to find a balance between the shapes and find out what works best for your game while maintaining high performance levels.
This example will take the penguin image, create three sprites from it and position them alongside each other, with one sprite having a box shape, another a circle shape and the last one using polygons for collision. When the game runs these sprites will fall down to the bottom of the screen and collide with the boundary. This is a useful test, as it allows us to visually see the differences between the available shapes and how this affects the behavior of sprites.
The initial code sets a virtual resolution of 320 x 480 and then loads the penguin image for use later:
SetVirtualResolution ( 320, 480 )


LoadImage ( 1, "penguin.png" )
The first sprite created (using an ID of 1) will be positioned on the left and use polygons to represent it within the simulation. The sprites are scaled down slightly and have their restitution value set so that they will bounce some. Here's the code for creating our first sprite:
CreateSprite                ( 1, 1 )
SetSpritePosition           ( 1, 0, 0 )
SetSpriteShape              ( 1, 3 )
SetSpritePhysicsOn          ( 1, 2 )
SetSpriteScale              ( 1, 0.6, 0.6 )
SetSpritePhysicsRestitution ( 1, 0.5 )
The second sprite created (using an ID of 2) will be positioned to the right of sprite 1 and have a circle shape assigned for its collision:
CreateSprite                ( 2, 1 )
SetSpritePosition           ( 2, 100, 0 )
SetSpriteShape              ( 2, 1 )
SetSpritePhysicsOn          ( 2, 2 )
SetSpriteScale              ( 2, 0.6, 0.6 )
SetSpritePhysicsRestitution ( 2, 0.5 )
The third sprite created (using an ID of 3 ) will be positioned to the right of sprite 2 and have a box shape assigned for its collision:
CreateSprite                ( 3, 1 )
SetSpritePosition           ( 3, 200, 0 )
SetSpriteShape              ( 3, 2 )
SetSpritePhysicsOn          ( 3, 2 )
SetSpriteScale              ( 3, 0.6, 0.6 )
SetSpritePhysicsRestitution ( 3, 0.5 )
Turning the physics debug on, before entering the main loop, is beneficial as the shapes being used for collision get drawn on screen. This is handled with a simple call:
SetPhysicsDebugOn ( )
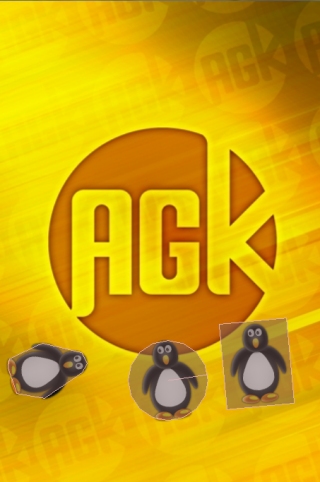
Everything is now in place. Nothing needs to happen in the main loop, all that's left to do is to run the application and see how each shape being used affects the collision. Here's the final code for our program:
SetVirtualResolution ( 320, 480 )


CreateSprite ( LoadImage ( "background3.jpg" ) )


LoadImage ( 1, "penguin.png" )


CreateSprite                ( 1, 1 )
SetSpritePosition           ( 1, 0, 0 )
SetSpriteShape              ( 1, 3 )
SetSpritePhysicsOn          ( 1, 2 )
SetSpriteScale              ( 1, 0.6, 0.6 )
SetSpritePhysicsRestitution ( 1, 0.5 )


CreateSprite                ( 2, 1 )
SetSpritePosition           ( 2, 100, 0 )
SetSpriteShape              ( 2, 1 )
SetSpritePhysicsOn          ( 2, 2 )
SetSpriteScale              ( 2, 0.6, 0.6 )
SetSpritePhysicsRestitution ( 2, 0.5 )


CreateSprite                ( 3, 1 )
SetSpritePosition           ( 3, 200, 0 )
SetSpriteShape              ( 3, 2 )
SetSpritePhysicsOn          ( 3, 2 )
SetSpriteScale              ( 3, 0.6, 0.6 )
SetSpritePhysicsRestitution ( 3, 0.5 )


SetPhysicsDebugOn ( )


do
    Sync ( )
loop
This example program is very useful in helping to understand the impact of using different collision shapes for your sprites. Where possible it's advisable to use circles, then boxes and if necessary polygons. When weighing up the options for your sprites consider whether a particular sprite really needs the most accurate collision (polygons) or whether it's possible to use a simpler shape like a circle.
![]()
App Game Kit © The Game Creators Ltd. All Rights Reserved. Report an issue