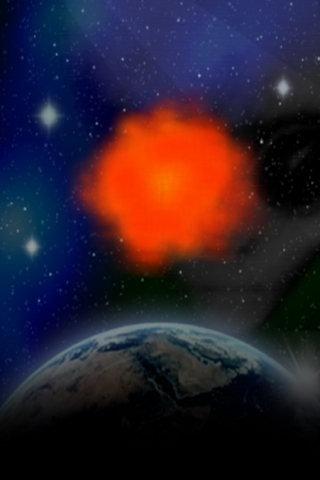
Creating explosions is a really simple process with the particle command set. In this example an explosion will be generated at a random location on screen, once it has finished and died off the process will be repeated.
This example program relies on an external image named "shrapnel3.png":

Prior to entering the main loop a virtual resolution will be set, along with an image being loaded (that is later used for the particles) and a particle emitter created (that is positioned off screen initially). The reason for creating the particle emitter at this point is that it will be used on a continual basis. There are occasions when it's useful to do this as it may be more efficient to recycle one emitter. The alternative would be to create an emitter every time an explosion is required, but that has the possiblity of slowing the program down and using more resources.
Here's the initial set up code:
SetVirtualResolution ( 320, 480 )
LoadImage ( 1, "shrapnel3.png" )
CreateParticles ( 1, -100, -100 )
Within the main loop a variable is checked to see whether it's possible to create the explosion, this value is true initially and is set to false once the explosion has been created, it only gets reset once the explosion has finished. This has the effect of allowing us to continually repeat the process of creating an explosion on screen.
Once it's possible to create an explosion certain properties of the emitter are set such as the position, life span, color key frames and more.
After the explosion has been created and displayed on screen a check is made to determine whether the particles have reached the end of their life, if this happens the emitter is reset and the variable to create explosions is set to true, thus allowing the next cycle of the main loop to create an explosion.
The code that creates this emitter is as follows:
if ( fire = 1 )
    SetParticlesPosition ( 1, Random ( 100, 200 ), Random ( 100, 300 ) )


    ResetParticleCount ( 1 )
    SetParticlesFrequency ( 1, 250 )
    SetParticlesLife ( 1, 3.0 )
    SetParticlesSize ( 1, 64 )
    SetParticlesStartZone ( 1, -10, 0, 10, 0 )
    SetParticlesImage ( 1, 1 )
    SetParticlesDirection ( 1, 10, 10 )
    SetParticlesAngle ( 1, 360 )
    SetParticlesVelocityRange ( 1, 0.8, 2.5 )
    SetParticlesMax ( 1, 500 )


    AddParticlesColorKeyFrame ( 1, 0.0, 0, 0, 0, 0 )
    AddParticlesColorKeyFrame ( 1, 0.5, 255, 255, 0, 255 )
    AddParticlesColorKeyFrame ( 1, 2.8, 255, 0, 0, 0 )


    AddParticlesForce ( 1, 2.0, 2.8, 25, -25 )


    fire = 0
endif
The code performs the following actions:
When the particle properties are set a call is made to the command SetParticlesMax. This command limits the maximum number of particles that can be emitted, in our case 500 particles. This command is necessary when you require particles to be emitted and then destroyed, such as in the case of an explosion. If this command was not called then particles would continually emit. We would get the same behaviour, with the difference being that the explosion would start, reach a certain point and then stay there - it would never disappear, this is why we need to set the maximum number of particles allowing our explosion to play through once and then vanish.
To determine whether all emitted particles have reached the end of their life call the command GetParticlesMaxReached and pass in the ID number of the particles. This command returns a value of 1 when the condition is true.
Our example will check when all emitted particles are dead and then reset the variable that controls whether an explosion can take place:
if ( GetParticlesMaxReached ( 1 ) )
    fire = 1
endif
The result is that as soon as an explosion has finished another one will be set up and emitted while using the same emitter.
Everything is now in place. Here's the final code for our program:
SetVirtualResolution ( 320, 480 )


CreateSprite ( LoadImage ( "alien_backdrop.jpg" ) )


LoadImage ( 1, "shrapnel3.png" )
CreateParticles ( 1, -100, -100 )


fire = 1


do
    if ( fire = 1 )
        SetParticlesPosition ( 1, Random ( 100, 200 ), Random ( 100, 300 ) )


        ResetParticleCount ( 1 )
        SetParticlesFrequency ( 1, 250 )
        SetParticlesLife ( 1, 3.0 )
        SetParticlesSize ( 1, 64 )
        SetParticlesStartZone ( 1, -10, 0, 10, 0 )
        SetParticlesImage ( 1, 1 )
        SetParticlesDirection ( 1, 10, 10 )
        SetParticlesAngle ( 1, 360 )
        SetParticlesVelocityRange ( 1, 0.8, 2.5 )
        SetParticlesMax ( 1, 500 )


        AddParticlesColorKeyFrame ( 1, 0.0, 0, 0, 0, 0 )
        AddParticlesColorKeyFrame ( 1, 0.5, 255, 255, 0, 255 )
        AddParticlesColorKeyFrame ( 1, 2.8, 255, 0, 0, 0 )


        AddParticlesForce ( 1, 2.0, 2.8, 25, -25 )


        fire = 0
    endif
    if ( GetParticlesMaxReached ( 1 ) )
        fire = 1
    endif
    sync ( )
loop
With a few simple lines of code it has been possible to create an explosion effect that could be used in a variety of scenarios for your games. Another interesting point of this example is the way in which the same emitter is continually used. Using emitters in this way is much more efficient over the approach of creating numerous emitters. It's something to consider when writing your own games.
![]()
App Game Kit © The Game Creators Ltd. All Rights Reserved. Report an issue